Showing posts with label Cisco Modeling Labs. Show all posts

Thursday 14 September 2023

How to run Cisco Modeling Labs in the Cloud

Cisco Modeling Labs, Cisco Certification, Cisco Tutorial and Materials, Cisco Career, Cisco Skills, Cisco Jobs, Cisco Preparation

You might think one answer to these problems would be to use CML in the cloud. And you’d be right. However, up until recently, the only supported platforms to run CML were either on bare metal servers or on VMware vSphere.

We have heard requests to have CML Software-as-a-Service (SaaS), and we’re working hard to make this a reality in the future. Our first step in this direction is to provide tooling and automation so you can deploy your CML instance into Amazon Web Services (AWS)! This tooling is available as of today on GitHub.

Setting expectations


With this first step of automation and tooling comes a few limitations, including:

  • Tooling is currently only supported on AWS. We’re working on making this also available on Azure in a subsequent release.
  • It only supports an all-in-one deployment. Subsequent releases could include deployment of multiple instances to form a CML cluster.
  • This approach needs a bare-metal flavor to support all node types. Metal flavors are more expensive than virtualized instances; however, AWS does not support virtualization extensions on their non-bare-metal flavors. This is different from Azure.
  • You need to bring your own AWS instance AND your own CML license. No pay-as-you-go consumption model is available as of today.
  • CML software and reference platform files from the “refplat ISO” need to be made available in a bucket.
  • Automation must run locally on your computer, particularly a Linux machine with Terraform.

Due to the nature of CML’s function, the ability to run it in the cloud will never be cheap (as in free-tier). CML requires a lot of resources, memory, disk, and CPU, which comes at a cost, regardless of whether you run it locally on your laptop, in your data center, or in the cloud. The idea behind the cloud is to simplify operation and provide elasticity but not necessarily to save money.

Meeting software requirements


The software requirements you’ll need to successfully use the tooling include:

  • a Linux machine (should also work on a Mac with the same packages installed via Homebrew)
  • a Bash shell (in case you use the upload tool, which is a Bash script)
  • a Terraform installation
  • the AWS CLI package (awscli with the aws command)
  • the CML software package (.pkg) and the CML reference platform ISO from CCO/cisco.com

An existing CML controller satisfies the first two requirements, and you can use that to install Terraform and the AWS CLI. It also has the reference platform files available to copy to an AWS S3 bucket. You also must download the CML distribution package from the Cisco support website and copy it to the AWS S3 bucket.

Cisco Modeling Labs, Cisco Certification, Cisco Tutorial and Materials, Cisco Career, Cisco Skills, Cisco Jobs, Cisco Preparation
Select the distribution package circled in the following screenshot (the version might be different, but it ends in .pkg.zip), and you’ll need to unzip it for the upload tool to recognize it

For more detail, refer to the “Upload script” section of the README.md that is included in the cml-cloud repository.

Getting up and running


Once you’ve installed the requirements and copied the files, you’ll find the actual procedure straight forward and meticulously documented in the README.md.

Here are the fundamental steps:

1. Configure the required S3 bucket, user, policies, secrets, and rules via AWS console (once).
2. Upload the binary files (images and software) into the created bucket (once or whenever new software is available).
3. Configure the tooling by editing the config.json file (once).
4. Run terraform plan followed by terraform apply to bring up an instance
5. Wait 5-10 minutes for the system to become ready; the address of the controller is provided as a result (“output” from Terraform)
6. Use CML in the cloud and profit!

Once you’re done, tear down the cloud infrastructure by executing terraform destroy.

Note: While no cost is incurred when you are not running CML instances, you’ll still need to pay for storing the files inside the created S3 bucket.

Taking the next steps


While CML AWS automation tooling is a first step toward CML SaaS, the tooling in its current form might not fit your needs exactly because of cost for bare-metal instances or the current dependency on AWS. Or you might want a pay-as-you-go service or something else. Let us know!

Just remember subsequent steps are ahead! Stay tuned, and tell us what you think in the meantime. We are extremely interested in how useful (or not) this first iteration of cloud tooling is to you and your organization and, going forward, what your specific requirements are.

Source: cisco.com

Saturday 12 August 2023

Inside the Cisco Modeling Labs 2.6 Workbench Revamp

Cisco Modeling Labs (CML) 2.6, the latest version of our premier network virtualization platform, is finally here. CML 2.6 offers quite a list of useful tools, with additions like Amazon Web Services (AWS) Cloud deployment and a new Maintenance mode for system admins.

However, I’m here to discuss the feature I’m most excited about:

CML 2.6 includes a revamped Workbench that allows users to see multiple devices, tools, and configs in the same view.


New features within revamped Workbench include:

  • a menu to add nodes to your workplace.
  • a sidebar hub to modify lab elements.
  • multi-select and right-click action menus.
  • keyboard shortcuts.
  • lab actions.
  • a panes panel for a more flexible workspace.

Continue reading for an in-depth look inside the Workbench revamp available in Cisco Modeling Labs’ latest feature release.

Inside the CML 2.6 Workbench revamp


Cisco Modeling, Cisco Certification, Cisco Tutorial and Materials, Cisco Career, Cisco Skills, Cisco Jobs, Cisco Prep, Cisco Preparation, Cisco
CML 2.6’s revamped Workbench includes UI enhancements that allow its users to contain multiple devices, tools, and configs in a single, integrated view. (Pictured: [1] Toolbar [2] Sidebar [3] Panes panel showing two open panes.)

Adding nodes with—or without—a mouse 

Incorporating new nodes into your workspace is still a straightforward process, whereby you can drag and drop your chosen type of node onto the canvas. But prior to CML 2.6, the interactive drag menu was on the right-side menu. Now, it’s activated by selecting the Add Nodes icon in the Workbench toolbar. 

Cisco Modeling, Cisco Certification, Cisco Tutorial and Materials, Cisco Career, Cisco Skills, Cisco Jobs, Cisco Prep, Cisco Preparation, Cisco
Select the “Add Nodes” icon (1) in the Workbench toolbar to activate the interactive drag menu.

In addition to this traditional method of adding nodes, we’ve introduced a brand-new feature called Bulk Add. It is designed with accessibility in mind, so you can add as many nodes as you need—using only your keyboard, eliminating the need for a mouse.  

Cisco Modeling, Cisco Certification, Cisco Tutorial and Materials, Cisco Career, Cisco Skills, Cisco Jobs, Cisco Prep, Cisco Preparation, Cisco
Now you can add nodes in bulk, mouse-free. Available in CML 2.6’s revamped Workbench.

Editing elements in the Sidebar 

We have redesigned the user interface to provide a more streamlined and unified experience for users as they edit elements within a lab. Now, in CML 2.6, the Sidebar serves as the single, consolidated hub for changing all your lab elements. Whether you want to edit a node, link, or annotation, simply select it, and the Sidebar will display the relevant editing options. 

Cisco Modeling, Cisco Certification, Cisco Tutorial and Materials, Cisco Career, Cisco Skills, Cisco Jobs, Cisco Prep, Cisco Preparation, Cisco
Select an element within your lab to instantly activate the Sidebar, a single, consolidated hub that offers a convenient menu of relevant editing options. (Pictured: [1] Node has been selected; [2] Sidebar appears with tabs categorized by property: SETTINGS, CONNECTIVITY, CONFIG, INTERFACES.) 

This streamlined way to manage your lab elements eliminates the need for the bottom panel to shift in response to the Workbench state. In turn, you benefit from a more focused experience. With this setup, you can keep your attention on the bottom pane while simultaneously editing the properties of a lab element using the Sidebar. 

Using the Multi-select Action menu 

You can activate the Multi-Select action menu by selecting multiple elements and right-clicking anywhere on the canvas. This action opens a Context-sensitive menu with a distinct section for each element type. 

Cisco Modeling, Cisco Certification, Cisco Tutorial and Materials, Cisco Career, Cisco Skills, Cisco Jobs, Cisco Prep, Cisco Preparation, Cisco
Select multiple elements and right-click anywhere on the canvas to activate the multi-action menu in the CML Workbench.

Within each section, you can perform actions on the corresponding element type. Please note: the system currently does not verify the validity of an action. Also, when you select multiple nodes, an Alignment section becomes available in the menu, providing options to align the selected nodes. 

Using the Right-click Context menu 

The Right-Click Context menu displays when you right-click a type of element: annotation, node, or link. This menu presents a list of actions specifically tailored to the selected element type. 

Cisco Modeling, Cisco Certification, Cisco Tutorial and Materials, Cisco Career, Cisco Skills, Cisco Jobs, Cisco Prep, Cisco Preparation, Cisco
Pictured above is an example of the Right-click Context menu for a link.

Note: the Right-click Context menu typically provides more actions for each element type compared to the Multi-select Action menu.

Keyboard shortcuts 

Cisco Modeling, Cisco Certification, Cisco Tutorial and Materials, Cisco Career, Cisco Skills, Cisco Jobs, Cisco Prep, Cisco Preparation, Cisco

Lab Actions menu 

You can find the Lab Actions menu in the toolbar under the “LAB” section. You can also activate this menu by right-clicking the canvas while no elements are selected. 

Cisco Modeling, Cisco Certification, Cisco Tutorial and Materials, Cisco Career, Cisco Skills, Cisco Jobs, Cisco Prep, Cisco Preparation, Cisco

Panes panel 

The Panes panel is a versatile tool designed to give you a flexible workspace. For one, the Panes panel allows you to open multiple tabs, each hosting a Console, VNC, or PCAP session. You can also choose how you want to host tabs: in only one pane or across multiple. For instance, you can have one pane containing an open console session while another runs a packet capture.

What to keep in mind when using the Panes panel:

  • One single pane is set by default, but you can add others by selecting the “+” icon.
  • If you have more than one pane, you will see one pane highlighted with a blue square, which indicates it will be the target for any new sessions you open. (You can change this by clicking in a different pane, which sets it as the new target.) 

To open a tab, simply right-click a running link or node, and open the corresponding session for VNC, Console, or PCAP. As an added convenience, you also have the option to select multiple nodes and simultaneously launch multiple sessions, streamlining your workflow. 

Once you have a tab open, you can easily reposition it by dragging it from one pane to another. This drag-and-drop functionality provides a straightforward way to organize your workspace according to your preference or need. 

The panes and their respective tabs are designed to retain their state on a per-browser and per-lab basis. This means your arrangement of panes and tabs, as well as the content within them, will remain as you set them (even if you navigate away or close your browser), providing a persistent working environment. 

Each pane tab is equipped with a context menu, which you can access by right-clicking the tab. This context menu contains options and actions that pertain specifically to the type of tab, giving you a set of relevant controls right at your fingertips. 

Cisco Modeling, Cisco Certification, Cisco Tutorial and Materials, Cisco Career, Cisco Skills, Cisco Jobs, Cisco Prep, Cisco Preparation, Cisco
If you have more than one pane, you will see one pane highlighted with a blue square (pictured above). This blue square indicates the target for any new sessions you open. You can change this by clicking in a different pane, which sets it as the new target.

To make your workspace even more customizable, you can rename tabs to reflect their content or purpose. You can either double-click on the tab, which will allow you to edit the name directly, or right-click on the tab and choose the Rename option from the context menu. 

The Carrot Down icon associated with each pane (see below) serves as a gateway to a menu. This menu displays a searchable list of all currently open sessions, making it easy for you to navigate directly to the session you need. 

Cisco Modeling, Cisco Certification, Cisco Tutorial and Materials, Cisco Career, Cisco Skills, Cisco Jobs, Cisco Prep, Cisco Preparation, Cisco
Using the Carrot Down menu option (1), you can quickly view all open sessions at a glance.

To help you track the relationship between your tabs and their associated elements, you can select a tab to view its corresponding node (or link) on the canvas. This means you can instantly see which parts of your lab you are currently interacting with via your session. 

If you need more canvas space temporarily, you can hide and show the Panes panel by clicking the “PANES” toolbar option.

Source: cisco.com

Saturday 15 April 2023

Make your network yours with CML 2.5 annotations

Cisco Modeling Labs (CML) 2.5 arrives with annotations, a new feature for all CML license levels. When learning and designing, annotations let you get the most out of your labs. Annotations allow you to include all the documentation on how parts of the network work, details about your learning objectives and next steps, or ways the network elements fit together. In short, the annotations feature in CML 2.5 lets you make your network yours. Here’s how it works.

Add context with annotations in CML


Annotations allow you to provide additional context to your lab topology and organize the elements in a helpful, meaningful way. For example, you can use annotations to show routing, IP addressing, and VLAN information, as shown below: 

Cisco Career, Cisco Skills, Cisco Jobs, Cisco Prep, Cisco Learning, Cisco Preparation, Cisco Learning, Cisco CML

Annotations in CML are persistent. This means annotations will be included in the lab definition if exported, allowing you to share your annotated labs with others.  

A grid background and node/annotation grid snapping are enabled by default. Snapping will automatically snap nodes and annotations to ensure they are properly aligned when drawing or moving them. You can turn off snapping for a lab by unchecking the snap to grid option in the toolbar settings. You can also temporarily disable snapping by holding the Alt key when you add or move a node/annotation. 

Additionally, annotations support transparency and layering, allowing you to stack annotations.

How to add annotations to labs in CML 2.5


You can add annotations to labs in the workbench via one of the four annotation tools in the toolbar. 

 There is one tool for each type of annotation: 

◉ Rectangle  
◉ Ellipsis 
◉ Text 
◉ Line

For all annotation types except text, you can add the annotations by first selecting the tool. Then click and hold the mouse where you want the annotation to start, and drag it to where you want it to end. Releasing the mouse will create the annotation, and you will see a sidebar with other properties you can change for the annotation. 

The process of adding a text annotation is similar, starting with selecting the tool. Next, click and release where you want the text. Finally, the sidebar will open, allowing you to enter the text you wish to use. 

New options in toolbar settings


Click the gear icon in the toolbar to open the canvas settings menu, which provides these new options for CML 2.5: 

1. Toggles the grid on/off 
2. Turns node/annotation snapping on/off 
3. Turns annotations off, hiding the drawn annotations and annotation tools 

NOTE: You can temporarily disable the snap-to-grid option by holding the Alt key (or Option key on a Mac) when moving or resizing an annotation/node. This lets you keep snapping enabled while precisely placing an annotation/node.  

Cisco Career, Cisco Skills, Cisco Jobs, Cisco Prep, Cisco Learning, Cisco Preparation, Cisco Learning, Cisco CML

Edit annotations


Selecting an annotation will toggle the visibility of the resize handles for the currently selected annotation. Additionally, a sidebar will be opened, allowing you to edit the annotation properties further

1. Resize Handles 
2. Sidebar 

Cisco Career, Cisco Skills, Cisco Jobs, Cisco Prep, Cisco Learning, Cisco Preparation, Cisco Learning, Cisco CML

Future annotations in CML


The CML development team is currently exploring adding an image annotation type in a future release to allow the addition of images inside a topology. 

Source: cisco.com

Tuesday 4 October 2022

CML 2.4 Now Supports Horizontal Scale With Clustering

Cisco Career, Cisco Certification, Cisco Jobs, Cisco Skills, Cisco Learning, Cisco Tutorial and Materials, Cisco Prep, Cisco Preparation, Cisco Scale

When will CML 2 support clustering?

This was the question we heard most when we released Cisco Modeling Labs (CML) 2.0 — and it was a great one, at that. So, we listened. CML 2.4 now offers a clustering feature for CML-Enterprise and CML-Higher Education licenses, which supports the scaling of a CML 2 deployment horizontally.

But what does that mean? And what exactly is clustering? Read on to learn about the benefits of Cisco Modeling Labs’ new clustering feature in CML 2.4, how clustering works, and what we have planned for the future.

Cisco Career, Cisco Certification, Cisco Jobs, Cisco Skills, Cisco Learning, Cisco Tutorial and Materials, Cisco Prep, Cisco Preparation, Cisco Scale

CML clustering benefits


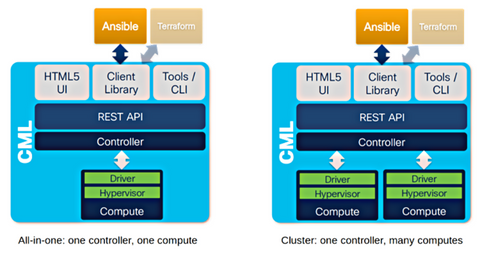
When CML is deployed in a cluster, a lab is no longer restricted to the resources of a single computer (the all-in-one controller). Instead, the lab can use resources from multiple servers combined into a single, large bundle of Cisco Modeling Labs infrastructure.

In CML 2.4, CML-Enterprise and CML-Higher Education customers who have migrated to a CML cluster deployment can leverage clustering to run larger labs with more (or larger) nodes. In other words, a CML instance can now support more users with all their labs. And when combining multiple computers and their resources into a single CML instance, users will still have the same seamless experience as before, with the User Interface (UI) remaining the same. There is no need to select what should run where. The CML controller handles it all behind the scenes, transparently!

How clustering works in CML v2.4 (and beyond)


A CML cluster consists of two types of computers:

◉ One controller: The server that hosts the controller code, the UI, the API, and the reference platform images

◉ One or more computes: Servers that run node Virtual Machines (VMs), for instance, the routers, switches, and other nodes that make up a lab. The controller controls these machines (of course), so users will not directly interact with them. Also, a separate Layer 2 network segment connects the controller and the computes. We chose the separate network approach for security (isolation) and performance reasons. No IP addressing or other services are required on this cluster network. Everything operates automatically and transparently through the machines participating in the cluster.
This intracluster network serves many purposes, most notably:

    ◉ serving all reference platform images, node definitions, and other files from the controller via NFS sharing to all computes of a cluster.

    ◉ transporting networking traffic in a simulated network (which spans multiple computes) on the cluster network between the computes or (in case of external connector traffic) to and from the controller.

    ◉ conducting low-level API calls from the controller to the computes to start/stop VMs, for example, and operating the individual compute.

Defining a controller or a compute during CML 2.4 cluster installation


During installation, and when multiple network interface cards (NICs) are present in the server, the initial setup script will ask the user to choose which role this server should take: “controller” or “compute.” Depending on the role, the person deploying the cluster will enter additional parameters.

For a controller, the important parameters are its hostname and the secret key, which computes will use to register with the controller. Therefore, when installing a compute, the hostname and key parameters serve to establish the cluster relationship with the controller.

Every compute that uses the same cluster network (and knows the controller’s name and secret) will then automatically register with that controller as part of the CML cluster.

CML 2.4 scalability limits and recommendations


We have tested clustering with a bare metal cluster of nine UCS systems, totaling over 3.5TB of memory and more than 630 vCPUs. On such a system, the largest single lab we ran (and support) is 320 nodes. This is an artificial limitation enforced by the maximum number of node licenses a system can hold. We currently support one CML cluster with up to eight computes.

Plans for future CML releases

While some limitations still exist in this release in terms of features and scalability, remember this is only Phase 1. This means the functionality is there, and future releases promise even more features, such as the:

◉ ability to de-register compute

◉ ability to put computes in maintenance mode.

◉ ability to migrate node VMs from one compute to another.

◉ central software upgrade and management of compute

Source: cisco.com