Showing posts with label network automation. Show all posts

Saturday, 10 August 2024

Optimizing AI Workloads with NVIDIA GPUs, Time Slicing, and Karpenter

Maximizing GPU efficiency in your Kubernetes environment


In this article, we will explore how to deploy GPU-based workloads in an EKS cluster using the Nvidia Device Plugin, and ensuring efficient GPU utilization through features like Time Slicing. We will also discuss setting up node-level autoscaling to optimize GPU resources with solutions like Karpenter. By implementing these strategies, you can maximize GPU efficiency and scalability in your Kubernetes environment.

Additionally, we will delve into practical configurations for integrating Karpenter with an EKS cluster, and discuss best practices for balancing GPU workloads. This approach will help in dynamically adjusting resources based on demand, leading to cost-effective and high-performance GPU management. The diagram below illustrates an EKS cluster with CPU and GPU-based node groups, along with the implementation of Time Slicing and Karpenter functionalities. Let’s discuss each item in detail.

Optimizing AI Workloads with NVIDIA GPUs, Time Slicing, and Karpenter

Basics of GPU and LLM


A Graphics Processing Unit (GPU) was originally designed to accelerate image processing tasks. However, due to its parallel processing capabilities, it can handle numerous tasks concurrently. This versatility has expanded its use beyond graphics, making it highly effective for applications in Machine Learning and Artificial Intelligence.

Optimizing AI Workloads with NVIDIA GPUs, Time Slicing, and Karpenter

When a process is launched on GPU-based instances these are the steps involved at the OS and hardware level:

  • Shell interprets the command and creates a new process using fork (create new process) and exec (Replace the process’s memory space with a new program) system calls.
  • Allocate memory for the input data and the results using cudaMalloc(memory is allocated in the GPU’s VRAM)
  • Process interacts with GPU Driver to initialize the GPU context here GPU driver manages resources including memory, compute units and scheduling
  • Data is transferred from CPU memory to GPU memory
  • Then the process instructs GPU to start computations using CUDA kernels and the GPU schedular manages the execution of the tasks
  • CPU waits for the GPU to finish its task, and the results are transferred back to the CPU for further processing or output.
  • GPU memory is freed, and GPU context gets destroyed and all resources are released. The process exits as well, and the OS reclaims the resource

Compared to a CPU which executes instructions in sequence, GPUs process the instructions simultaneously. GPUs are also more optimized for high performance computing because they don’t have the overhead a CPU has, like handling interrupts and virtual memory that is necessary to run an operating system. GPUs were never designed to run an OS, and thus their processing is more specialized and faster.

Optimizing AI Workloads with NVIDIA GPUs, Time Slicing, and Karpenter

Large Language Models


A Large Language Model refers to:

  • “Large”: Large Refers to the model’s extensive parameters and data volume with which it is trained on
  • “Language”: Model can understand and generate human language
  • “Model”: Model refers to neural networks

Optimizing AI Workloads with NVIDIA GPUs, Time Slicing, and Karpenter

Run LLM Model


Ollama is the tool to run open-source Large Language Models and can be download here https://ollama.com/download

Pull the example model llama3:8b using ollama cli

ollama -h
Large language model runner
Usage:
  ollama [flags]
  ollama [command]
Available Commands:
  serve Start ollama
  create Create a model from a Modelfile
  show Show information for a model
  run Run a model
  pull Pull a model from a registry
  push Push a model to a registry
  list List models
  ps List running models
  cp Copy a model
  rm Remove a model
  help Help about any command
Flags:
  -h, --help help for ollama
  -v, --version Show version information
Use "ollama [command] --help" for more information about a command.

ollama pull llama3:8b: Pull the model


ollama pull llama3:8b
pulling manifest 
pulling 6a0746a1ec1a... 100% ▕██████████████████████████████████████████████████████████████████ 4.7 GB 
pulling 4fa551d4f938... 100% ▕██████████████████████████████████████████████████████████████████ 12 KB 
pulling 8ab4849b038c... 100% ▕██████████████████████████████████████████████████████████████████ 254 B 
pulling 577073ffcc6c... 100% ▕██████████████████████████████████████████████████████████████████ 110 B 
pulling 3f8eb4da87fa... 100% ▕██████████████████████████████████████████████████████████████████ 485 B 
verifying sha256 digest 
writing manifest 
removing any unused layers 
success

ollama list: List the models


developer:src > ollama show llama3:8b
  Model 
        arch llama 
        parameters 8.0B 
        quantization Q4_0 
        context length 8192 
        embedding length 4096 

  Parameters 
        num_keep 24 
        stop "<|start_header_id|>" 
        stop "<|end_header_id|>" 
        stop "<|eot_id|>" 

  License 
        META LLAMA 3 COMMUNITY LICENSE AGREEMENT 
        Meta Llama 3 Version Release Date: April 18, 2024

ollama run llama3:8b: Run the model


developer:src > ollama run llama3:8b
>>> print all primes between 1 and n
Here is a Python solution that prints all prime numbers between 1 and `n`:
```Python
def print_primes(n):
    for possiblePrime in range(2, n + 1):
        # Assume number is prime until shown it is not. 
        isPrime = True
        for num in range(2, int(possiblePrime ** 0.5) + 1):
            if possiblePrime % num == 0:
                isPrime = False
                break
        if isPrime:
            print(possiblePrime)
n = int(input("Enter the number: "))
print_primes(n)
```
In this code, we loop through all numbers from `2` to `n`. For each number, we assume it's prime and then check if it has any 
divisors other than `1` and itself. If it does, then it's not a prime number. If it doesn't have any divisors, then it is a 
prime number.
The reason why we only need to check up to the square root of the number is because a larger factor of the number would be a 
multiple of smaller factor that has already been checked.
Please note that this code might take some time for large values of `n` because it's not very efficient. There are more 
efficient algorithms to find prime numbers, but they are also more complex.

Source: cisco.com

Saturday, 8 June 2024

Cisco AI Assistant for Managing Firewall Policies Is Now Available

Cisco AI Assistant is now available for Cisco XDR and Cisco Defense Orchestrator


Managing firewall policies and locating relevant documentation can be daunting for firewall administrators. However, the AI Assistant integrated with the Cisco Defense Orchestrator (CDO) and the cloud-delivered Firewall Management Center simplifies these processes. With this powerful combination, administrators can effortlessly manage firewall devices, configure policies, and access reference materials whenever required, streamlining their workflow and boosting overall efficiency.

Prerequisites


Administrators need to ensure they have met the following prerequisites to use the AI Assistant:

User roles:

● CDO and cloud-delivered Firewall Management Center – Super Admin or Admin
● On-Prem FMC – Global Domain Admin

Upon successful login into your tenant, you will notice an AI Assistant button positioned in the top menu bar of the dashboard.

Cisco AI Assistant for Managing Firewall Policies Is Now Available

Click the AI Assistant button on the CDO or cloud-delivered Firewall Management Center home page to access the AI Assistant.

The Cisco AI Assistant interface contains the following components: Text Input Box, New Chat, Chat History, Expand View, and Feedback.

Cisco AI Assistant for Managing Firewall Policies Is Now Available

Cisco AI Assistant interface following the best Generative AI assistant practices.

AI Assistant interaction


AI Assistant completion with the prompt “Can you provide me with the distinct IP addresses that are currently blocked by our firewall policies?”

Cisco AI Assistant for Managing Firewall Policies Is Now Available

AI Assistant completion with the prompt “What access control rules are disabled?”

Cisco AI Assistant for Managing Firewall Policies Is Now Available

If you think that response is wrong, please click the thumbs-down button below for the related completion and fill out and submit the form.

Cisco AI Assistant for Managing Firewall Policies Is Now Available

AI Assistant can’t proceed with some prompts and questions. In this case, you can see the following completion:

Cisco AI Assistant for Managing Firewall Policies Is Now Available

It looks like the engineering team decided not to display answers if there is insufficient data to correct them or in cases where the model can hallucinate.

Source: cisco.com

Thursday, 7 March 2024

Using the Power of Artificial Intelligence to Augment Network Automation

Talking to your Network


Embarking on my journey as a network engineer nearly two decades ago, I was among the early adopters who recognized the transformative potential of network automation. In 2015, after attending Cisco Live in San Diego, I gained a new appreciation of the realm of the possible. Leveraging tools like Ansible and Cisco pyATS, I began to streamline processes and enhance efficiencies within network operations, setting a foundation for what would become a career-long pursuit of innovation. This initial foray into automation was not just about simplifying repetitive tasks; it was about envisioning a future where networks could be more resilient, adaptable, and intelligent. As I navigated through the complexities of network systems, these technologies became indispensable allies, helping me to not only manage but also to anticipate the needs of increasingly sophisticated networks.

Using the Power of Artificial Intelligence to Augment Network Automation

In recent years, my exploration has taken a pivotal turn with the advent of generative AI, marking a new chapter in the story of network automation. The integration of artificial intelligence into network operations has opened up unprecedented possibilities, allowing for even greater levels of efficiency, predictive analysis, and decision-making capabilities. This blog, accompanying the CiscoU Tutorial, delves into the cutting-edge intersection of AI and network automation, highlighting my experiences with Docker, LangChain, Streamlit, and, of course, Cisco pyATS. It’s a reflection on how the landscape of network engineering is being reshaped by AI, transforming not just how we manage networks, but how we envision their growth and potential in the digital age. Through this narrative, I aim to share insights and practical knowledge on harnessing the power of AI to augment the capabilities of network automation, offering a glimpse into the future of network operations.

In the spirit of modern software deployment practices, the solution I architected is encapsulated within Docker, a platform that packages an application and all its dependencies in a virtual container that can run on any Linux server. This encapsulation ensures that it works seamlessly in different computing environments. The heart of this dockerized solution lies within three key files: the Dockerfile, the startup script, and the docker-compose.yml.

The Dockerfile serves as the blueprint for building the application’s Docker image. It starts with a base image, ubuntu:latest, ensuring that all the operations have a solid foundation. From there, it outlines a series of commands that prepare the environment:

FROM ubuntu:latest

# Set the noninteractive frontend (useful for automated builds)
ARG DEBIAN_FRONTEND=noninteractive

# A series of RUN commands to install necessary packages
RUN apt-get update && apt-get install -y wget sudo ...

# Python, pip, and essential tools are installed
RUN apt-get install python3 -y && apt-get install python3-pip -y ...

# Specific Python packages are installed, including pyATS[full]
RUN pip install pyats[full]

# Other utilities like dos2unix for script compatibility adjustments
RUN sudo apt-get install dos2unix -y

# Installation of LangChain and related packages
RUN pip install -U langchain-openai langchain-community ...

# Install Streamlit, the web framework
RUN pip install streamlit

Each command is preceded by an echo statement that prints out the action being taken, which is incredibly helpful for debugging and understanding the build process as it happens.

The startup.sh script is a simple yet crucial component that dictates what happens when the Docker container starts:

cd streamlit_langchain_pyats
streamlit run chat_with_routing_table.py

It navigates into the directory containing the Streamlit app and starts the app using streamlit run. This is the command that actually gets our app up and running within the container.

Lastly, the docker-compose.yml file orchestrates the deployment of our Dockerized application. It defines the services, volumes, and networks to run our containerized application:

version: '3'
services:
 streamlit_langchain_pyats:
  image: [Docker Hub image]
  container_name: streamlit_langchain_pyats
  restart: always
  build:
   context: ./
   dockerfile: ./Dockerfile
  ports:
   - "8501:8501"

This docker-compose.yml file makes it incredibly easy to manage the application lifecycle, from starting and stopping to rebuilding the application. It binds the host’s port 8501 to the container’s port 8501, which is the default port for Streamlit applications.

Together, these files create a robust framework that ensures the Streamlit application — enhanced with the AI capabilities of LangChain and the powerful testing features of Cisco pyATS — is containerized, making deployment and scaling consistent and efficient.

The journey into the realm of automated testing begins with the creation of the testbed.yaml file. This YAML file is not just a configuration file; it’s the cornerstone of our automated testing strategy. It contains all the essential information about the devices in our network: hostnames, IP addresses, device types, and credentials. But why is it so crucial? The testbed.yaml file serves as the single source of truth for the pyATS framework to understand the network it will be interacting with. It’s the map that guides the automation tools to the right devices, ensuring that our scripts don’t get lost in the vast sea of the network topology.

Sample testbed.yaml


---
devices:
  cat8000v:
    alias: "Sandbox Router"
    type: "router"
    os: "iosxe"
    platform: Cat8000v
    credentials:
      default:
        username: developer
        password: C1sco12345
    connections:
      cli:
        protocol: ssh
        ip: 10.10.20.48
        port: 22
        arguments:
        connection_timeout: 360

With our testbed defined, we then turn our attention to the _job file. This is the conductor of our automation orchestra, the control file that orchestrates the entire testing process. It loads the testbed and the Python test script into the pyATS framework, setting the stage for the execution of our automated tests. It tells pyATS not only what devices to test but also how to test them, and in what order. This level of control is indispensable for running complex test sequences across a range of network devices.

Sample _job.py pyATS Job


import os
from genie.testbed import load

def main(runtime):

    # ----------------
    # Load the testbed
    # ----------------
    if not runtime.testbed:
        # If no testbed is provided, load the default one.
        # Load default location of Testbed
        testbedfile = os.path.join('testbed.yaml')
        testbed = load(testbedfile)
    else:
        # Use the one provided
        testbed = runtime.testbed

    # Find the location of the script in relation to the job file
    testscript = os.path.join(os.path.dirname(__file__), 'show_ip_route_langchain.py')

    # run script
    runtime.tasks.run(testscript=testscript, testbed=testbed)

Then comes the pièce de résistance, the Python test script — let’s call it capture_routing_table.py. This script embodies the intelligence of our automated testing process. It’s where we’ve distilled our network expertise into a series of commands and parsers that interact with the Cisco IOS XE devices to retrieve the routing table information. But it doesn’t stop there; this script is designed to capture the output and elegantly transform it into a JSON structure. Why JSON, you ask? Because JSON is the lingua franca for data interchange, making the output from our devices readily available for any number of downstream applications or interfaces that might need to consume it. In doing so, we’re not just automating a task; we’re future-proofing it.

Excerpt from the pyATS script


    @aetest.test
    def get_raw_config(self):
        raw_json = self.device.parse("show ip route")

        self.parsed_json = {"info": raw_json}

    @aetest.test
    def create_file(self):
        with open('Show_IP_Route.json', 'w') as f:
            f.write(json.dumps(self.parsed_json, indent=4, sort_keys=True))

By focusing solely on pyATS in this phase, we lay a strong foundation for network automation. The testbed.yaml file ensures that our script knows where to go, the _job file gives it the instructions on what to do, and the capture_routing_table.py script does the heavy lifting, turning raw data into structured knowledge. This approach streamlines our processes, making it possible to conduct comprehensive, repeatable, and reliable network testing at scale.
Using the Power of Artificial Intelligence to Augment Network Automation

Enhancing AI Conversational Models with RAG and Network JSON: A Guide


In the ever-evolving field of AI, conversational models have come a long way. From simple rule-based systems to advanced neural networks, these models can now mimic human-like conversations with a remarkable degree of fluency. However, despite the leaps in generative capabilities, AI can sometimes stumble, providing answers that are nonsensical or “hallucinated” — a term used when AI produces information that isn’t grounded in reality. One way to mitigate this is by integrating Retrieval-Augmented Generation (RAG) into the AI pipeline, especially in conjunction with structured data sources like network JSON.

What is Retrieval-Augmented Generation (RAG)?


Retrieval-Augmented Generation is a cutting-edge technique in AI language processing that combines the best of two worlds: the generative power of models like GPT (Generative Pre-trained Transformer) and the precision of retrieval-based systems. Essentially, RAG enhances a language model’s responses by first consulting a database of information. The model retrieves relevant documents or data and then uses this context to inform its generated output.

The RAG Process


The process typically involves several key steps:

  • Retrieval: When the model receives a query, it searches through a database to find relevant information.
  • Augmentation: The retrieved information is then fed into the generative model as additional context.
  • Generation: Armed with this context, the model generates a response that’s not only fluent but also factually grounded in the retrieved data.

The Role of Network JSON in RAG


Network JSON refers to structured data in the JSON (JavaScript Object Notation) format, often used in network communications. Integrating network JSON with RAG serves as a bridge between the generative model and the vast amounts of structured data available on networks. This integration can be critical for several reasons:
  • Data-Driven Responses: By pulling in network JSON data, the AI can ground its responses in real, up-to-date information, reducing the risk of “hallucinations.”
  • Enhanced Accuracy: Access to a wide array of structured data means the AI’s answers can be more accurate and informative.
  • Contextual Relevance: RAG can use network JSON to understand the context better, leading to more relevant and precise answers.

Why Use RAG with Network JSON?


Let’s explore why one might choose to use RAG in tandem with network JSON through a simplified example using Python code:

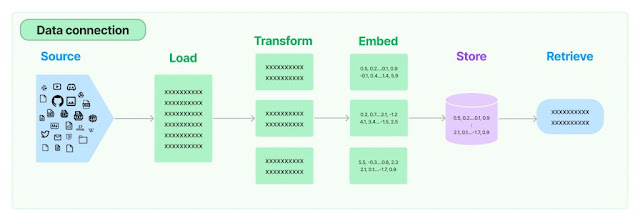
  • Source and Load: The AI model begins by sourcing data, which could be network JSON files containing information from various databases or the internet.
  • Transform: The data might undergo a transformation to make it suitable for the AI to process — for example, splitting a large document into manageable chunks.
  • Embed: Next, the system converts the transformed data into embeddings, which are numerical representations that encapsulate the semantic meaning of the text.
  • Store: These embeddings are then stored in a retrievable format.
  • Retrieve: When a new query arrives, the AI uses RAG to retrieve the most relevant embeddings to inform its response, thus ensuring that the answer is grounded in factual data.

By following these steps, the AI model can drastically improve the quality of the output, providing responses that are not only coherent but also factually correct and highly relevant to the user’s query.

class ChatWithRoutingTable:
    def __init__(self):
        self.conversation_history = []
        self.load_text()
        self.split_into_chunks()
        self.store_in_chroma()
        self.setup_conversation_memory()
        self.setup_conversation_retrieval_chain()

    def load_text(self):
        self.loader = JSONLoader(
            file_path='Show_IP_Route.json',
            jq_schema=".info[]",
            text_content=False
        )
        self.pages = self.loader.load_and_split()

    def split_into_chunks(self):
        # Create a text splitter
        self.text_splitter = RecursiveCharacterTextSplitter(
            chunk_size=1000,
            chunk_overlap=100,
            length_function=len,
        )
        self.docs = self.text_splitter.split_documents(self.pages)

    def store_in_chroma(self):
        embeddings = OpenAIEmbeddings()
        self.vectordb = Chroma.from_documents(self.docs, embedding=embeddings)
        self.vectordb.persist()

    def setup_conversation_memory(self):
        self.memory = ConversationBufferMemory(memory_key="chat_history", return_messages=True)

    def setup_conversation_retrieval_chain(self):
        self.qa = ConversationalRetrievalChain.from_llm(llm, self.vectordb.as_retriever(search_kwargs={"k": 10}), memory=self.memory)

    def chat(self, question):
        # Format the user's prompt and add it to the conversation history
        user_prompt = f"User: {question}"
        self.conversation_history.append({"text": user_prompt, "sender": "user"})

        # Format the entire conversation history for context, excluding the current prompt
        conversation_context = self.format_conversation_history(include_current=False)

        # Concatenate the current question with conversation context
        combined_input = f"Context: {conversation_context}\nQuestion: {question}"

        # Generate a response using the ConversationalRetrievalChain
response = self.qa.invoke(combined_input)

        # Extract the answer from the response
answer = response.get('answer', 'No answer found.')

        # Format the AI's response
        ai_response = f"Cisco IOS XE: {answer}"
        self.conversation_history.append({"text": ai_response, "sender": "bot"})

        # Update the Streamlit session state by appending new history with both user prompt and AI response
        st.session_state['conversation_history'] += f"\n{user_prompt}\n{ai_response}"

        # Return the formatted AI response for immediate display
        return ai_response

Conclusion

The integration of RAG with network JSON is a powerful way to supercharge conversational AI. It leads to more accurate, reliable, and contextually aware interactions that users can trust. By leveraging the vast amounts of available structured data, AI models can step beyond the limitations of pure generation and towards a more informed and intelligent conversational experience.

Source: cisco.com

Saturday, 25 June 2022

Our future network: insights and automation

Insights and automation will power our future network. Think of it as a circular process: collect data from network infrastructure. Analyze it for insights. Share those insights with teams to help them improve service. Use the insights to automatically reprogram infrastructure where possible. Repeat. The aim is to quickly adapt to whatever the future brings—including new traffic patterns, new user habits, and new security threats.

Cisco Certification, Cisco Learning, Cisco Preparation, Cisco Jobs, Cisco Tutorial and Material, Cisco Automation

Now I’ll dive into more detail on each block in the diagram.

Insights


Data foundation. Good insights can only happen with good data. We collect four types of data:

◉ Inventory data for compliance reporting and lifecycle management
◉ Configuration data for audits and to find out about configuration “drift”
◉ Operational data for network service health monitoring
◉ Threat data to see what parts of our infrastructure might be under attack—e.g., a DDoS attack on the DMZ, or a botnet attack on an authentication server

Today, some network data is duplicated, missing (e.g., who authorized a change), or irrelevant. To prepare for our future network, we’re working to improve data quality and store it in centralized repositories such as our configuration management database.

Analytics. With a trusted data foundation, we’ll be able to convert data to actionable insights. We’re starting by visualizing data—think color-coded dials—to make it easier to track key performance indicators (KPIs) and spot trends. Examples of what we track include latency and jitter for home VPN users, and bandwidth and capacity for hybrid cloud connections. We’re also investing in analytics for decision support. One plan is tracking the number of support tickets for different services so we can prioritize the work with the biggest impact. Another is monitoring load and capacity on our DNS infrastructure so that we can automatically scale up or down in different regions based on demand. Currently, we respond to performance issues manually—for instance, by re-routing traffic to avoid congestion. In our future network we’ll automate changes in response to analytics. Which leads me to our next topic: automation.

Automation


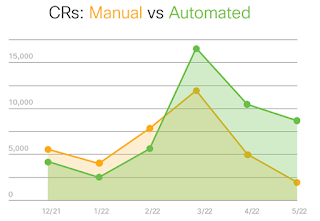
Policy and orchestration. February 2022 marked a turning point: we now fulfill more change requests via automation than we do manually. As shown in the figure, we automatically fulfilled more than 7,500 change requests in May 2022, up from fewer than 5,000 just six months earlier. Examples include automated OS upgrades with Cisco DNA Center Software Image Management (SWIM), compliance audits with an internally developed tool, and daily configuration audits with an internal tool we’re about to swap out for Cisco Network Services Orchestrator. We have strong incentives to automate more and more tasks. Manual activities slow things down, and there’s also the risk that a typo or overlooked step will affect performance or security.

Cisco Certification, Cisco Learning, Cisco Preparation, Cisco Jobs, Cisco Tutorial and Material, Cisco Automation
In our future network, automation will make infrastructure changes faster and more accurate. Our ultimate goal is a hands-off, AIOps approach. We’re building the foundation today with an orchestrator that can coordinate top-level business processes and drive change into all our domains. We are working closely with the Cisco Customer Experience (CX) group to deploy Business Process Automation solution. We’re developing workflows that save time for staff by automating pre- and post-validation and configuration management. The workflows integrate with IT Service Management, helping us make sure that change requests comply with Cisco IT policy.

Release management. In the past, when someone submitted a change request one or more people manually validated that the change complied with policy and then tested the new configuration before putting it into production. This takes time, and errors can affect performance or security. Now we’re moving to automated release pipelines based on modern software development principles. We’re treating infrastructure as code (IaC), pulling device configurations from a single source of truth. We’ve already automated access control list (ACL) management and configuration audits. When someone submits a change to the source of truth (typically Git), the pipeline automatically checks for policy compliance and performs tests before handing off the change for deployment.

The Road Ahead


To sum up, in our future network, the only road to production is through an automated pipeline. Automation helps us adapt more quickly to unexpected change, keeps network configuration consistent worldwide, and reduces the risk of errors. We can’t anticipate what changes our business will face between now and 2025—but with insights and automation, we’ll be able to adapt quickly.

Source: cisco.com

Saturday, 14 August 2021

How To Simplify Cisco ACI Management with Smartsheet

Cisco ACI Management, Cisco Exam Prep, Cisco Learning, Cisco Tutorial and Material, Cisco Guides, Cisco Learning

Have you ever gotten lost in the APIC GUI while trying to configure a feature? Or maybe you are tired of going over the same steps again and again when changing an ACI filter or a contract? Or maybe you have always asked yourself how you can integrate APIC with other systems such as an IT ticketing or monitoring system to improve workflows and making your ACI fabric management life easier. Whatever the case may be, if you are interested in finding out how to create your own GUI for ACI, streamline and simplify APIC GUI configuration steps using smartsheets, and see how extensible and programmable an ACI fabric is, then read on.

Innovations that came with ACI

I have always been a fan of Cisco ACI (Application Centric Infrastructure). Coming from a routing and switching background, my mind was blown when I started learning about ACI. The SDN implementation for data centers from Cisco, ACI, took almost everything I thought I knew about networking and threw it out the window. I was in awe at the innovations that came with ACI: OpFlex, declarative control, End-Point Groups (EPGs), application policies, fabric auto discovery, and so many more.

The holy grail of networking

It felt to me like a natural evolution of classical networking from VLANs and mapped layer-3 subnets into bridge domains and subnets and VRFs. It took a bit of time to wrap my head around these concepts and building underlays and overlays but once you understand how all these technologies come together it almost feels like magic. The holy grail of networking is at this point within reach: centrally defining a set of generic rules and policies and letting the network do all the magic and enforce those policies all throughout the fabric at all times no matter where and how the clients and end points are connecting to the fabric. This is the premise that ACI was built on.

Automating common ACI management activities

So you can imagine when my colleague, Jason Davis (@snmpguy) came up with a proposal to migrate several ACI use cases from Action Orchestrator to full blown Python code I was up for the challenge. Jason and several AO folks have worked closely with Cisco customers to automate and simplify common ACI management workflows. We decided to focus on eight use cases for the first release of our application:

◉ Deploy an application

◉ Create static path bindings

◉ Configure filters

◉ Configure contracts

◉ Associate EPGs to contracts

◉ Configure policy groups

◉ Configure switch and interface profiles

◉ Associate interfaces to policy groups

Using the online smartsheet REST API

You might recognize these as being common ACI fabric management activities that a data center administrator would perform day in and day out. As the main user interface for gathering data we decided to use online smartsheets. Similar to ACI APIC, the online smartsheet platform provides an extensive REST API interface that is just ripe for integrations.

The plan was pretty straight forward:

1. Use smartsheets with a bit of JavaScript and CSS as the front-end components of our application

2. Develop a Python back end that would listen for smartsheet webhooks triggered whenever there are saved Smartsheet changes

3. Process this input data based on this data create, and trigger Ansible playbooks that would perform the configuration changes corresponding to each use case

4. Provide a pass/fail status back to the user.

Cisco ACI Management, Cisco Exam Prep, Cisco Learning, Cisco Tutorial and Material, Cisco Guides, Cisco Learning
The “ACI Provisioning Start Point” screen allows the ACI administrator to select the
Site or APIC controller that needs to be configured.

Cisco ACI Management, Cisco Exam Prep, Cisco Learning, Cisco Tutorial and Material, Cisco Guides, Cisco Learning
Once the APIC controller is selected, a drop down menu displays a list of all the use
cases supported. Select to which tenant the configuration changes will be applied,
and fill out the ACI configuration information in the smartsheet.

Cisco ACI Management, Cisco Exam Prep, Cisco Learning, Cisco Tutorial and Material, Cisco Guides, Cisco Learning
Selecting the checkbox for Ready to Deploy, and saving the smartsheet, will trigger a webhook event that will be intercepted by the backend code and the Ansible configuration playbook will be run.

A big advantage to using Smartsheets compared to the ACI APIC GUI is that several configuration changes can be performed in parallel. In this example, several static path bindings are created at the same time.

Find the details on DevNet Automation Exchange


You can also find hundreds of similar use case examples in the DevNet Automation Exchange covering all Cisco technologies and verticals and all difficulty levels.

Drop me a message in the comments section if you have any questions or suggestions about this automation exchange use case.

Source: cisco.com

Friday, 19 February 2021

Introduction to Terraform with ACI – Part 3

Cisco Developer, Cisco ACI, Cisco DevNet, Cisco Network Automation, Cisco Terraform, Cisco Preparation, Cisco Exam Prep

If you haven’t already seen the previous Introduction to Terraform posts, please have a read through. This “Part 3” will provide an explanation of the various configuration files you’ll see in the Terraform demo.

Introduction to Terraform

Terraform and ACI

Code Example

https://github.com/conmurphy/terraform-aci-testing/tree/master/terraform

Configuration Files

You could split out the Terraform backend config from the ACI config however in this demo it has been consolidated. 

Cisco Developer, Cisco ACI, Cisco DevNet, Cisco Network Automation, Cisco Terraform, Cisco Preparation, Cisco Exam Prep

config-app.tf

The name “myWebsite” in this example refers to the Terraform instance name of the “aci_application_profile” resource. 

The Application Profile name that will be configured in ACI is “my_website“. 

When referencing one Terraform resource from another, use the Terraform instance name (i.e. “myWebsite“).

Cisco Developer, Cisco ACI, Cisco DevNet, Cisco Network Automation, Cisco Terraform, Cisco Preparation, Cisco Exam Prep

config.tf

Only the key (name of the Terraform state file) has been statically configured in the S3 backend configuration. The bucket, region, access key, and secret key would be passed through the command line arguments when running the “terraform init” command. See the following for more detail on the various options to set these arguments.


Cisco Developer, Cisco ACI, Cisco DevNet, Cisco Network Automation, Cisco Terraform, Cisco Preparation, Cisco Exam Prep

terraform.tfvars

Cisco Developer, Cisco ACI, Cisco DevNet, Cisco Network Automation, Cisco Terraform, Cisco Preparation, Cisco Exam Prep

variables.tf

We need to define the variables that Terraform will use in the configuration. Here are the options to provide values for these variables:

◉ Provide a default value in the variable definition below
◉ Configure the “terraform.tfvars” file with default values as previously shown
◉ Provide the variable values as part of the command line input

$terraform apply –var ’tenant_name=tenant-01’

◉ Use environmental variables starting with “TF_VAR“

$export TF_VAR_tenant_name=tenant-01

◉ Provide no default value in which case Terraform will prompt for an input when a plan or apply command runs

Cisco Developer, Cisco ACI, Cisco DevNet, Cisco Network Automation, Cisco Terraform, Cisco Preparation, Cisco Exam Prep

versions.tf

Cisco Developer, Cisco ACI, Cisco DevNet, Cisco Network Automation, Cisco Terraform, Cisco Preparation, Cisco Exam Prep

Source: cisco.com

Tuesday, 9 February 2021

Explore NSO in the new Always-On DevNet Sandbox

Cisco Prep, Cisco Preparation, Cisco Tutorial and Material, Cisco Guides, Cisco Career

Today’s model-driven programmability makes the network a core foundation for revenue generation. Therefore, companies must implement network orchestration to simplify their entire lifecycle management for services. For virtualized networks, this means transparent orchestration that spans multiple domains in the network and includes network functions virtualization (NFV), and software-defined networking (SDN), and the traditional physical network with all its components.

This is where Network Service Orchestration or NSO steps up. NSO is a model-driven (YANG) platform for automating your network orchestration. It supports multi-vendor networks through a rich variety of Network Element Drivers (NEDs). Supporting it supports the process of validation and implementing, as well as abstracting network configuration and network services, and providing support for the entire transformation into intent-based networking.

How does it work?

NSO gathers, parses, and stores the configuration state of the network devices it manages in a configuration database (CDB). Users and other applications can then ask NSO to create, read, update, or delete configurations in a programmatic way either ad hoc or through customizable network services. NSO uses software packages called Network Element Drivers (NEDs) to facilitate telnet, SSH, or API interactions with the devices that it manages. The NED provides an abstraction layer that reads in the device’s running configuration and parses it into a data-model-validated snapshot in the CDB. 

Cisco Prep, Cisco Preparation, Cisco Tutorial and Material, Cisco Guides, Cisco Career

The NEDs also allow for the reverse – i.e., creating network configuration from CDB data inputs and then sending the configurations to the network devices. There are hundreds of NEDs covering all the Cisco platforms (including IOS-XE, IOS-XR, NX-OS, and ASA) and all major non-Cisco platforms. 

Want to get hands-on now? 


You’re in luck! Check out the new DevNet NSO sandbox. You’ll find a production NSO server deployed to manage the multi-platform network within the sandbox environment lab. This network is made up of Cisco NX-OS, IOS, IOS XE, IOS XR, and ASA devices, and includes Linux hosts which can be used as clients for connectivity testing. 

Cisco Prep, Cisco Preparation, Cisco Tutorial and Material, Cisco Guides, Cisco Career

This always-on sandbox lab provides access to everything you need to explore the APIs for NSO, as well as develop network automation packages and services for use in your networks.   If you are just getting started with NSO APIs check out the new updated Postman Collection which has been updated to work with the new always-on NSO Sandbox. 

Cisco Prep, Cisco Preparation, Cisco Tutorial and Material, Cisco Guides, Cisco Career

Now you have everything you need to get started with NSO – Import, the collection in your Postman client set the environment for the new Always-On NSO sandbox and start making API calls today! You can find the new DevNet NSO sandbox here, no reservation is required.


Source: cisco.com

Thursday, 4 February 2021

DevNet Automation Bootcamps Overcome the Forgetting Curve

Cisco Certification, Cisco Exam Prep, Cisco Preparation, Cisco Guides, Cisco Learning, Cisco Career

We’ve all heard about the learning curve – showing the relationship between time spent studying material and proficiency.

Cisco Certification, Cisco Exam Prep, Cisco Preparation, Cisco Guides, Cisco Learning, Cisco Career
The Learning Curve

Research indicates that there are multiple factors that impact the technology learning curve – or how quickly people can learn new technologies.

Some of them include:

◉ Motivation – this can come from internal motivation, work related motivation, or even the accountability provided by a good instructor

◉ Relevancy – training that is immediately relevant to your situation is more engaging

◉ Training modality – training that is multi-modal – visual, aural, kinesthetic (or see, hear, do) focused is, all else being equal, more successful than single modal

◉ Complexity of topic – more complex topics (ACI) are more difficult than simple topics (making a cheese sandwich).

◉ Repetition – repetition over several days

What many people don’t realize is that there is an analogous “forgetting curve,” which is surprisingly steep. Students sometimes leave a 5-day training and get back to their home environments and feel frustrated because they can’t do what they learned.

Cisco Certification, Cisco Exam Prep, Cisco Preparation, Cisco Guides, Cisco Learning, Cisco Career
Forgetting Curve

DevNet Automation Bootcamps help your team focus, learn, and retain


The same factors that make it easier to learn new ideas, also help combat the forgetting curve. The newly launched DevNet Automation Bootcamp is based on recent andragogy research about not just how adults learn, but how to help them retain their knowledge.

The goal of a bootcamp is to maximize your team’s ability to leave with the knowledge, skills, and confidence to implement what you’ve learned.

Automation Bootcamps flatten the forgetting curve by providing an immersive training experience where we:

1. Focus on what you are most motivated to learn – the ideal customer for the Bootcamp has a goal, a big change, for example an implementation, taking over work from a vendor, building a new team, or implementing a new technology. The students generally need the skills, and they need them soon.  They know that they will be using what they learn within the next few months.  They are motivated.

2. Provide just the training you need and remove training you don’t – Every lecture and lab is relevant – the Cisco team starts by interviewing the customer and learning exactly what they need to know to succeed, and creating a tailored outline – focusing on the areas the customer needs and taking out any training they don’t need. This maximizes classroom time as all topics are identified as important for the success of their project.

3. Deliver training based on technical learning research and styles – the bootcamp brings together the best of instructor led training and self-paced training in a robust format that maximizes student learning and retention.

4. Reduce complexity – the mix of tailored content, multi-modal learning, repetition, and bootcamp style labs helps students internalize complex topics and take the learning back to their home environments and succeed.

5. Repeat concepts at different levels to lock in knowledge and build confidence – The training is broken up into three portions, and each portion reiterates and deepens the core knowledge of the topics:

◉ 5-days of instructor led training –This is foundational training focusing on the concepts, paradigms, and a deep introduction to the core concepts reinforced with over 40% labs

◉ 2-3 weeks of self-paced training with regular instructor led review sessions, leveraging the “flipped classroom” model and using repetition to settle the learning into the retention parts of the brain

◉ 4-days of hands-on deep dive lab where the students are taking their knowledge and applying it in hands on labs and building end-to-end solutions and/or troubleshooting real issues

In the 5-Day instructor-led training, you’ll work with Cisco experts to identify topics specific to your situation. In the 4-day deep dive lab, you’ll extend the skills you gained in the 5-day class

Examples of Automation Bootcamps Topics


ACI Troubleshooting and Operations Immersion Bootcamp

◉ 5-Day Instructor-led training – May include an introduction to ACI (fabric infrastructure, configuration) and ACI Operations (configuration management, monitoring, and troubleshooting)

◉ 4-day Deep Dive Lab – May include building an ACI fabric and troubleshoot issues and then explore ACI Multisite, ACI Multipod, hypervisor integration, complex ACI configuration problems.

ACI Automation Bootcamp

◉ 5-Day Instructor-led training – May include an introduction to automation (Python, APIs, and more) and then dive into ACI automation with Python, SDKs, tools, and more.

◉ 4-day Deep Dive Lab – May include exploring automation actions, tools, toolkits, SDKs and doing deep labs on ACI REST API interface, ACI API Inspector, ACIToolkit, Ansible, pyATS, and CI/CD pipelines using GitLab-CI.

NSO Automation Bootcamp

◉ 5-Day Instructor-led training – May include intro to NSO (components, use cases, installation, NETCONF/YANG, manage devices) NSO services, administration, and DevOps.

◉ 4-day Deep Dive Lab – May include exploring introductory techniques such as installation, the network CLI and config database, and more. Or choose to practice advanced topics such as Python-powered services, advanced YANG constructs, northbound integratiosn, and more.

NX-OS Automation Bootcamp

◉ 5-Day Instructor-led training – May include an intro to automation (Python, APIs, and more) and exploration of NX-OS automation (day-zero provisioning, on-box / off-box programmability, and telemetry).

◉ 4-day Deep Dive Lab – May include performing complete automation actions and learning the roles of tools, toolkits, and SDKs. You will build gain immersive experience with technologies such as NX-API CLI and NX-API REST, model-driven programmability, GuestShell, Ansible, NX-SDK, pyATS, CML, and CI/CD pipelines using GitLab-CI.

Meraki Automation Bootcamp

◉ 5-Day Instructor-led training – May include intro to automation (Python, APIs, and more) and Meraki automation (workflows, APIs, and more)

◉ 4-day Deep Dive Lab – May include exploring Meraki Dashboard and REST, Meraki action batches, and troubleshoot common Meraki issues, or focus on automation provisioning and configuration.

SDA Product Immersion Bootcamp

◉ SDA 5-Day Instructor-led training – May include an introduction to SDA (Cisco SDA fundamentals, provisioning, policies, wireless integration, and border operations) and SDA operations (operating, managing, and integrating Cisco DNA Center, and understanding programmable network infrastructure)

◉ SDA 4-day Deep Dive Lab – May include performing complete SDA implementation tasks. You will build an SD-Access fabric network and nodes and then solve common issues using troubleshooting use cases.